by Greg Gerber
Greenfield High School Video Coordinator & Wide Receivers Coach
Follow @CoachMitts

Amp-up videos are a very important part of football. We use them to get the blood flowing and the
adrenaline cranked up. After all, don’t
we all share the guilty pleasure of combing through YouTube trying to find
videos that showcase big hits, amazing catches or plays where the running back
breaks 24 tackles and does a flip at the end?
Well now you, too, can make your own amp up video using the team’s Hudl
account (and your own athletes’ amazing plays).
Welcome to Amp-up Video Creation 101!
Follow these simple instructions to showcase your team and get them pumped
for the following week’s game!
Step 1: Log on to your Hudl account. Watch the film from the previous week and highlight each big play. You do this by selecting the star on the left-hand side and selecting “team”. You can also add specific athletes to the highlight. This will help when the players themselves want to make a video for their own page. (Stay tuned: We’ll talk more about this in a future blog.
Step 2:Once you have finished selecting all of
the plays you want to showcase, go to your highlights page. Once there, scroll down till you see this:

Click on “New Premium Highlight” and you will be
taken to this screen:

When you are on this
screen, give your video a title and fill in the bottom sections with which team
you’re playing and the date. This does
double duty in cataloging your videos for the year.
Step 3: Once all of the fields are filled in, select
the current season from the right-hand menu.
Once you click the season, you will be given all of the games you have previously
highlighted as an option.
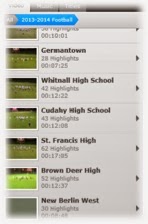

Select the game you want to clip together, and the highlights you selected for that game will be shown.
Step 4:To add the clip to your video, all you have to do is put your cursor over the clip and a green plus sign will appear. Click the plus sign and the clip will be automatically added to your video.

Step 4a: After
adding the clip to your video, you will see the clip pop up in the editor. It will look like this:

From here, you will
be able to not only trim the clip but also highlight where the viewers
attention should be focused.
If you film like we do, you obviously have more
than just that play on your clip. To cut
just the play you want from the clip, focus your attention to the scroll bar
with one green and one red arrow (bottom of the screen). Here is a close up of it:
With Hudl, all you have to do is click on the
green arrow and move it to where you want the clip to start. Then do the same with the red arrow to signal
the end.

The part between the two arrows will be what
plays in your video.
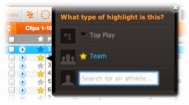
Step 4b: When
you have the clip set to the length you want, you need to highlight the action
as we mentioned before. To do this, all
you have to do is play the clip. A few
moments before the play snaps, click on the player you want to highlight.

Once you do that,
this box will pop up. It allows you
three different highlight options and allows you to adjust both the size and
direction of the marker. Once you are
happy with the size, click done. This
will mark the player in the video.
Step 5: Repeat Step 4 as many times as you have clips
to add. As you go through the clips, you
may feel that not all of the highlights should go into the video. That is fine.
They will still remain team highlights.
Step 6: Add in some
music to the video. To add music, click
the Music tab on the top right of your editing screen.

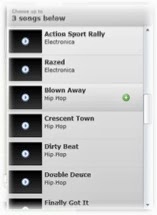 Once you click the music tab, you are given
several different music choices to add to your video. After you pick one that you want to add,
select the green plus sign just like you did for the video clips. You can choose up to three songs depending on
the length of your highlight video.
Once you click the music tab, you are given
several different music choices to add to your video. After you pick one that you want to add,
select the green plus sign just like you did for the video clips. You can choose up to three songs depending on
the length of your highlight video.Step 7: When you have all of the video cut to your liking, and the music added, it’s time to preview your work. To do this, all you have to do is click the “Save & Preview” button on the top right of your editor:

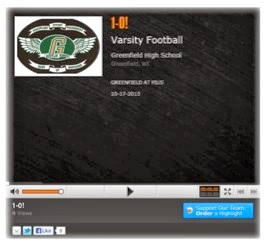
If you like the video,
and feel that no other changes need to be made after you watch the preview,
click the “Save & Close” button and it’s ready to go. Your video will be saved to your teams
highlight page.
What? You want to
take it to the next level? Of course you do!
Step 8: In this
social media world, we can share everything so why not share your amp up video?
Just click the social media icon (email,
twitter, facebook) at the bottom left hand of the screen, and then all of your
followers can take a peek!
Our amp-up videos have become a tradition for our team. It is something our kids have grown to really
look forward to each week. What is even
better is how the players are starting to make videos for their own pages and
personal use (but like I said, more on that one soon)
So tell me what you think?
Do you use Hudl to make your videos?
Do you use something different?
After seeing how easy it is, do you think you will start this tradition
with your own team? Talk to me
coaches!
No comments:
Post a Comment